Hey all,

I’m busily working on the Drinks for Business website where there are sitll many changes to be done. Did a whisky tasting session yesterday so I couldn’t finish all of the final tweaks. This should be up and running tomorrow hopefully. @www.drinksforbusiness.com

Here is the work in progress of the final look of the overal website. Lots of tweaks still to be done…

>>WORK IN PROGRESS

As mentioned before I’ve made some hand-crafted birthday cards for my friends this September. I wasn’t able to attend their birthday party, therefore I created these cards in the middle of the night (apparently I work better in the ungodly hours of the night due to research conducted during my art foundation year XD) which I sent off to them the next day.

Please check the gallery below for images.

Hello Kitty Birthday Card for Jo

Materials: Card, Coloured paper, Black card, Paper and Colouring Pencils

This was made by cutting out all sort of coloured card to match the Hello Kitty colours and then various other pieces to create decorations to the card. A simple design of the Hello Kitty head was used since my friend didn’t llike the whole body/shape of Hello Kitty that much despite being a Hello Kitty fan o.O (Yes she’s an odd one I must say XD)

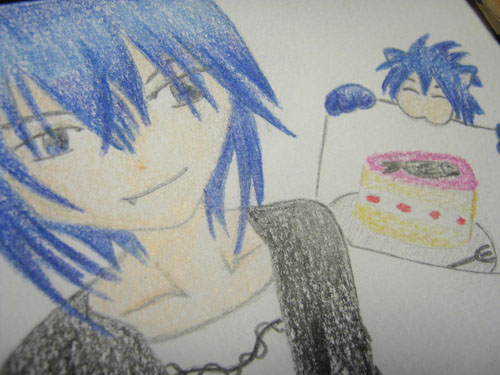
Ikuto (Shugo Chara) Birthday Card for Chung

Materials: Card and Colouring Pencils

This was a simple drawing of Ikuto and Yoru from the anime Shugo Chara drawn with a pencil and coloured with Crayola colouring pencils.

Stiletto Shoe Birthday Card for Eva

Materials: Card, Pink Sequins, Black Card, Used Wrapping Paper and Ribbon

This card was created from used wrapping paper, a stiletto image cut out from Black card and many pink sequins to continue the pattern on the wrapping paper. She loves shoes and especially stilettos thus the idea behind this card ^_________^

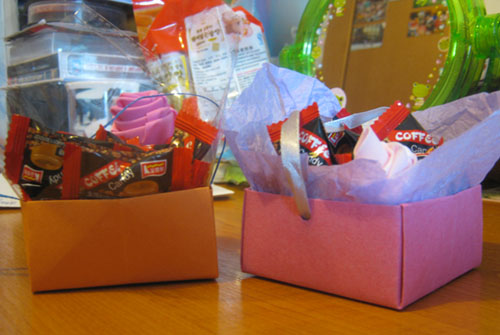
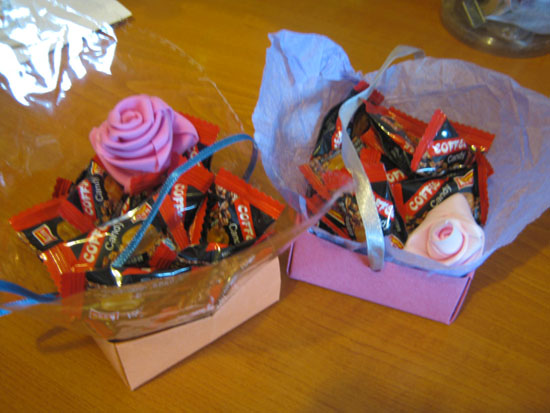
Origami Boxes for friends

Materials: Coloured Paper, Ribbon and strips of foam for roses.

My mum came back from holiday and bought home some coffee sweets she wanted to give to some friends but wanted them to be presented well. Therefore I went online to find out how to make origami boxes. (http://www.origami-instructions.com/origami-box.html) After making the simple boxes out of the card I punched holes on either side of the tubs and threaded ribbon through to create handles for the tubs so the recipent could hold the sweets. I’ve also used tissue paper and clear plastc to decorate the interior of the tub and then lastly used a self-folded foam rose to add a finihsing touch. These were then filled up with the coffee sweets.

Right so it’s that time of year again… Being a student, in recession and not being able to spend much due to saving up for a holiday I’m having to think of ideas to create something for each of my dear friends to remember me by this christmas 2009. I’m therefore making this into a small project for myself. I did have the idea of drawing each of them a picture and frame it so they’re able to hang it up on a wall. However it’ll take me a while to think of an image to draw (did think about doing chibi pics of each of them but I can’t place an anime to each and every one) and also head over to Ikea to grab the small photo frames. I couldn’t order the frames online which means trekking making an hour trip. Pointless. I think I’ll use that idea for birthday presents instead.

Therefore my project for Christmas presents 2k9 is to make everyone a simple booklet filled with memories ^_________^ Yup I’m to add photos, drawings, notes, scribbles, deep thoughts, things I’ve really wanted to say, jokes I want to share, anything I want to say to that person and them only. This is a mini from-me-to-you scrapbook which I think would be a cute yet personal present to my friends. In total a number of 15 scrapbooks will be made. All hopefully filled with juicy content to fit 20-20 pages (depending on the amount I want to say inside). I’ll photograph some of the finished scrapbook content and possibly the process should I remember to ^^;;

I’ve just done some research on scrapbooking:

‘The craft of scrapbooking is the preservation of your photographs and memories in archival quality albums using photo-safe materials. Photographs are cropped, pages decorated and memories recorded to create beautiful keepsakes for the enjoyment of generations to come. Stickers, decorative scissors, cropping aids, coloured papers and pens are all used to create imaginative and lasting album pages. Get those photographs out of those old boxes and cupboard drawers and into beautiful albums, reminisce and enjoy your memories with your loved ones whilst creating a lasting family treasure.’ – http://memorykeepsakes.co.uk/

Since doing art foundation I’ve managed to collect many pieces of scrap paper, sugar paper, left over tissue paper, used wrapping paper, tissue paper and bags from shopping packaging (BabyCham has really cute and pretty tissuepaper!). I shall be using these in my mini scrapbooks to decorte them and make them look pretty!

There are many websites which sell supplies for this hobby but I shall try to be eco-friendly and reuse items found in the house, packaging or from work. Wish me luck!

Note: I’ve created some hand-made cards in the past month. They’re really cute and I shall share them with you soon once I have the images on the new computer! (Yes it died not long ago and I just installed Photoshop ;-;)

So I’ve finally taken some screenshots of my flash application I handed in for my Multimedia Application assignment. To remind you it was a childrens application which taught them how to read and some basic maths. Lots of cute images were drawn for this particular application.  Sound clips were used to aid the learning process and help the child along.  Here they are!

I had finally finished my animation for the opening of the film and added it to sound effects and music. It is the opening of a film, where it talks about a childrens artist who draws and plans a story but doesn’t like it in the end and is frustrated trying to find a story to give to her publisher. A guest arrives at the door who is actually her publisher and wants to know her new story. Little that he knows that this artist has a big crush on him! Therefore she slams the door on him because she hadn’t slept for days and was in a big big state… End.

(There was more to this story where she does the classic speedy change and greets him at the door once her appearance had changed, but I wasn’t happy with the filming as it didn’t work too well and was a very hard piece of film to edit into a seamless opening sequence.)

Here is the final render of my 3D animation project where I keyframe animated a model of a windchime I did in 3D Studio Max from scratch. This took a long time to render in high quality. I hope you enjoy.

I would have added sound effects of wind chimes but unfortunately I ran out of time and could only find a file which was of low quality and had beeping noises in the background. Therefore I opted to use the music piece instead.

I did initially want to model a rose but it would have been very hard to model an organic object in the amount of time I had. It was not an appropriate idea and would have taken me a long time to figure out how to model one petal and animate it. I might aim to model it in the future.

On Thursday I started scanning in all the slides I drew for the animation. I drew them on some blank flash cards using the lightbox my friend’s mum made. The card could make a flipbook and actually works in some areas but as I drew over 70+ frames, it caused a problem trying to hold the cards together… I’m thinking of buying a large clip to hold the cards together and see if it helps flipping the cards and submitting it along with the rest of the DVD film.The scanning process took a whole hour to do on a Epsom scanner connected to an Apple Mac Pc. Took a while for me to understand the layout of Macs and where my H Drive was. Hehe.
I’m still debating whether to purchase an Apple Mac Laptop or a PC Laptop with Windows 7. I really like Windows 7 when I was still using the beta version. The navigation through folders was much easier and the rollover feature on the content of each item on the toolbar was a nice touch. It made multi-tasking much easier and efficient! Would anyone be able to give me some pointers?
Right back to the topic. Below are some images I took whilst scanning the cards in. Look how organised I was! I placed the scanned images on the left, the scene that needed to be scanned in the middle and the the rest of the cards on the right. I also kept note of the files in my mini notepad I bought to write my ideas and notes in; seeing I’m a forgetful person this method helps out the most. I took the piles of card at different intervals (mostly after scanning after a whole scene) so I might make it into a mini animation and include it into the DVD at the end.

All I’m currently doing is altering the images in Photoshop to define the lines and give the pencil mark more depth so it stands out on screen. I’m also erasing dark areas in the images where I’ve smudged the pencil. (The rubber wouldn’t get rid of it…) Next I would have to resize all the images to fit on a 4:6 Pal television screen and animate the frames in Adobe Premier. So this project should finally be able to come together and the animation will be running smoothly soon!! I just need to write the narrative for it so my friend Tash can do the voice over. Should be lots of fun!

Met the deadline and managed to hand in the Flash application assignment at 8:30pm on Wednesday. Was very pleased to be able to finish the proposed application and the documentation (24 pages!!!) before the building shut, but I almost got locked in trying to rush and hand it in on the 4th floor XDDD Luckily the caretaker shouted out and asked if anyone was still left and I yelled down from the 4th floor. I had my hand stuck in the hand in box and lost the pen lid… I’m sure the school office ladies will be happy to find a nice purple file with a free pen lid!

I shall post some screenshots of the final games application my friend and I created in Flash using ActionScript 3.0. We were given the brief to create a promotional application to be distributed on CD. We chose to create an educational application for children aged 5-7 and included 3 games in the application (if given more time many things would have been improved and added). The games included characters which spoke and taught the child how to play, or they would congratulate the child if they were successful in the game. All items including graphics and voices were self-made and therefore a very unique application. I really do help we get a good grade for this as it took forever to make but there are also many ideas I would have liked implemented…

Designs

Well since the first idea fell through the roof I had to come up with a back up plan and planned my synopsis again. Once that was done I started filming my two friends, Tash and Ben for the second part of the video. Basically I aim to create and animation for the beginning of the movie which then merges into the real live footage. People have asked me if I’ve seen Monty Python but I reply No. I haven’t seen it there but have elsewhere. It was an idea that popped into my head anyway xP

Anywhoo the filming took a whole day to do during the Easter holidays as Tash kept laughing… I could do an outtakes section in the DVD o.o I just need to edit the footage next week and also scan in the flipbook animation I did at my friend’s house using her make-shift lightbox! Here are some photos of my workspace I had on her study’s floor XD

Blog Stats

  • 4,860 hits